Apple Documents iOS8 Roaming Behavior

Saw this document posted to Twitter and Facebook earlier this morning. With all the changes that came in iOS 8 related to wifi and roaming, there are some very good details here.

http://on.clemmer.co/1uwkpOC

I’ll digest this more over the next couple of days, but looks to explain a lot of the new behavior I’ve seen.

Posted in Apple, Wireless | Leave a comment

Qualcomm Atheros drive 802.11ac 2.0?

Getting back into the habit of scanning the RSS feeds while traveling, and came across this article on Fierce Wireless:

http://on.clemmer.co/131ofDW

Two things jumped out at me.

First … with the QCA9377 chipset, it looks like the 802.11ac wave 2 clients supporting MU-MIMO are getting to the market potentially quicker than I expected. Granted, the chip had to be created before the gadget vendors could start incorporating it into products, not to mention needing to test firmware and iron out any interoperability issues, but still it’s a mark of progress.

Secondly, what’s with “802.11ac 2.0”? Is this like the old “5G” moniker that was tried to put on some of the original 802.11ac products to get them to stand out for consumers? We seemed to have a pretty well understood and adopted nomenclature around wave 1 and wave 2 functionality. Does having individual vendors adding marketing labels to the functionality help or hurt market adoption and understanding of the technology?

Either way, get ready for some new clients on the networks!

Posted in Wireless | Leave a comment

Aruba POE+ From Cisco 3560CG

A few months back, there was a conversation on twitter started by @WiFivomFranMan raising the issue of less than expected performance when testing the Aruba AP225 along with 802.11ac clients. At the time, I did not have my hands on an AP220 to test with myself, but indications seemed to suggest that the Cisco 3560CG-8 that Kevin was using to provide POE power to his test AP225, was not providing more than 802.3af power. Having finally gotten my hands on an AP224 for my own testing, I’ll dig into this deeper.

I’m using a Cisco Catalyst 3560-8PC-S to provide 802.3at POE to my test APs. As an 802.3af power source, I haven’t had any issues with it. Booting up the AP224 while connected to the Cisco 3560CG, the following output was shown on the AP console:

802.3af POE

The highlighted row showing POE as only 802.3af is what got my attention. Further, showing power stats from the 3560CG also matched up to this:

power inline

When connecting the AP224 directly to an Aruba S2500-48, instead of seeing the statement with 802.3af power, the AP correctly reports 802.3at power:

802.3at POE

What’s the difference between the 3560CG-8 and the S2500-48? My first thought took my back to pre-standard POE and experiences with Cisco equipment leveraging CDP to signal things like POE or voice VLAN. The Aruba S2500 doesn’t support CDP, but does use LLDP instead. Great! The Cisco 3560CG-8 also supports LLDP, but as I found it’s not enabled by default. This is verified by running “show lldp neighbors”, which will respond with “% LLDP is not enabled”.

Running the configuration command “lldp run” globally enabled LLDP on the switch, and started advertising LLDP on all interfaces. With LLDP running, the AP224 correctly reports 802.3at power as well as the switch port showing the higher power draw:

Screen Shot 2013-11-08 at 4.15.39 PM

So that’s all it was, enabling LLDP on the Catalyst 3560CG-8 provides the necessary signalling for enabling 802.3at power to an Aruba Access Point.

Posted in Aruba | Leave a comment

Surface RT Upgrade to Windows 8.1 Preview

Ok. I admit it. I’ve been struggling to wrap my brain around Windows 8 and the new interface. In the course of working with a few other Surface users, I’ve gotten second hand feedback on the Windows 8.1 preview so decided it was time to take it for a pin myself.

Microsoft has a how-to article for upgrading migrating to the Windows 8.1 Preview here. In addition to the general upgrade article, I also referenced this article on creating a USB recovery drive, here.

The Surface tablet uses the Recovery Partition in repair or install the primary operating system. In order to upgrade to the Windows 8.1 Preview, the Recovery Partition is first upgraded to 8.1, followed by the active partition. Since the Recovery Partition will not be able to restore the Surface tablet back to Windows 8, creating a USB Recovery Drive provides that fallback option.

To start creating the Recovery Drive, search for “recovery”, then select “Create a recovery drive”, as seen below.

Screenshot (3)

Once the Recovery Utility starts, the first question is the basic “are you sure you want to create a recovery drive” message. The only option here is to click the checkbox and go to Next.

Screenshot (4)

If multiple USB drives are available, select the appropriate drive to format. In the case of the Surface RT, there is only one USB port, so unless an external USB hub is in use there should only be one USB drive to select.

Screenshot (5)

Select “Create” in order to acknowledge the warning message. Creating the USB Recovery Drive will cause the USB drive to be reformatted. Any data previously on the USB drive will be lost.

Screenshot (6)

The Recovery Utility will provide status as the drive is created.

Screenshot (8)

Finally, once the USB Recovery Drive has been completed, you will get a positive confirmation message. At this point, the USB Drive can be ejected and stored in a safe place in case needed later.

Screenshot (9)

With the USB Recovery Drive created, download the small Windows 8.1 Preview installer from the first article referenced in this write up.

Screenshot (10)

After the updater has been installed and the tablet restarted, proceed to the Windows Store to start the download process.

Screenshot (11)


After the download from the Windows Store is completed, the tablet will reboot several times. Each time, updates are being made to different components.

Finally, after booting up and logging in to the newly upgraded tablet, re-run Windows Update to check for any modifications that might be available. With my Surface RT tablet, there were 17 updates as well as a device firmware update that needed to be applied.

With the updates applied, enjoy!

Posted in Microsoft, Surface | Leave a comment

Adding IPv6 Mgmt with net-snmp

I had meant to post a short blog on this awhile back, but as part of my “Move it to the Cloud” experience I found myself looking for my old notes when the setup didn’t go straight forward enough, so now’s as good a time as any for getting that knocked out.

Most of the daemon configuration, at least in a ubuntu environment, is done with config files in /etc/snmp. I have to keep catching myself that it’s not /etc/snmpd, but just /etc/snmp. The primary config file for the SNMP daemon is snmpd.conf.

When setting up net-snmpd 5.4.3 (which is what I currently have as part of my ubuntu 12 environment), there are options to set the listen ports/protocols within the /etc/snmp/snmpd.conf config file. In my testing, these options seem to be largely ignored. The snmpd.conf file is the correct place to make your SNMPv2c or SNMPv3 configurations, however the protocol (IPv4 vs IPv6) and port settings (udp 161 or something non-standard) seem to be largely overlooked in this file.

To add to the confusion, when I thought I could make the needed changes to the startup script file, I didn’t find what I was looking for in /etc/init.d/snmpd.

What ended up working for me, was to make the needed changes to /etc/default/snmpd.

Config file for net-snmpd command line options

Config file for net-snmpd command line options

Two things:

After the command line switch where you specify the pid file, I add the protocol/port option udp6:161 to get the daemon to listed on IPv6, UDP socket 161. For whatever reason, when I added this switch, I found the daemon was not scanning the default config file for community/user information, so I also had to add the “-c” switch and point it back to /etc/snmp/snmpd.conf for that.

If I’ve missed something simple and actually caused more work here, please respond with a comment. I would definitely appreciate the feedback.


Posted in IPv6 | Leave a comment

Update: ESXi Install on MacMini

Time flies!

Back in July when I did the brief write up on installing ESXi 5.0U1 on the MacMini, I promised a more in-depth write up on the steps taken from the various linked articles. Since we’re now past VMWorld and vSphere 5.1 has been announced/released, I’m going to hold off on the detailed documentation until I can run through the process with 5.1 so that everything is current.

My plan is to have this write up published in the next two weeks, work load permitting.

Posted in Apple, VMware | Leave a comment

The Galaxy Tab 10.1 Gets Ice Cream Sandwich!

When Blake Krone (@blakekrone on twitter) posted on twitter that his Galaxy Tab 10.1 had notified him of an OTA update to ICS (Android OS 4.0), I had to pull my old Tab out of the mothballs and dust bunnies to see if it would do the same. It took a day or two after recharging the battery and turning it on before it notified me of the update, but once it did the download was a piece of cake.

My Galaxy Tab 10.1 now runs ICS!

One of the last things I had done with my Tab was to install MetaGeek’s inSSIDer for Android. My first test of ICS would be firing up inSSIDer and observing all the WiFi wonders … something I don’t get to do with my iPad, thanks to Apple.

First things first … inSSIDer tells me just how quiet the 5GHz spectrum is at my house. In fact, it’s a little two quiet. Where are the two Airport Extreme’s that provide my home (non-lab) WiFi? My Mac is connected to one even, why isn’t inSSIDer seeing them? Thinking maybe it was a problem with inSSIDer, I fired off a few other Wifi apps (Wifi Analyzer and Wolf WiFi Pro), but the results were the same. Somewhere with the process of upgrading to ICS, my Tab had lost it’s 5GHz functionality. Not cool!

A quick Google search revealed I was not alone in my experience. It seems the ICS firmware that gets pushed out in a lot of cases is actually a European build, so the 5GHz bands are disabled by default. The posts that I found offered validation by looking into the file /system/etc/wifi/nvram_net.txt and look for the ccode entry to be set to GB. Sure enough, there it was.

Unfortunately (or fortunately, depending on your rationale), the only way I could see to correct this was to root the tablet and set the file correctly for myself. This is my first attempt at rooting an android device, made slightly more obscure in that all the websites I found with pointers to the process were using Windows, not OSX. In the end, I was successful, and wanted to document what I did.

First, guys at xda-developers are a huge source of knowledge when it comes to Android devices. Most of the work I did actually came from these guys. There was one exception, when it came to the actual root package to install, where the file linked on xda-developers was no longer valid and so I pulled it instead from galaxytabhacks.com.

There were specifically two posts that got me started. “How to Root the Samsung Galaxy Tab 10.1” set the basic step-by-step procedure for how to accomplish rooting of a basic ICS 4.0 tablet. I’m not looking to add custom ROMs or anything like that … the tablet has already been upgraded to ICS 4.0.4 via the OTA download, I just needed to root the device to edit the one system file. The first article links to downloading the Odin3_v1.85.exe app that will be needed for installing the clockworkmod recovery image. I did have to do this from Windows, but this was easy enough to do within Fusion with my Win7 image. The second post, “flash and root new 4.0.4 ICS stock rom” walks through the specific rooting process. Since the tab already has ICS on it, I skipped the first step that references using Mobile Odin to actually upgrade the tab to ICS.

Once I had clockworkmod recovery installed, I grabbed the rooting file bundle from galaxytabhacks.com (since the update.zip file on xda-developers was no longer a valid link) and completed the process.

With the device rooted, I just needed to grab a decent file manager and make the changes.  I had previously grabbed Astro file manager to verify that the nvram_net.txt file was the culprit, but even after rooting the tablet, Astro wouldn’t allow me to edit the file because the /system partition is mounted read only. Instead, I grabbed ES File Explorer from the Play Store, as it provides the needed root support to make the change. I changed the ccode value to ccode=US, rebooted the tab, and now my 5GHz functionality is restored!

Next up … testing with AirMapper now that I have full wireless functionality restored…

Posted in Android, Wireless | 1 Comment

Move it to the Cloud!

I know what you’re thinking … all this talk about “Cloud” is an awful lot like the talk about “BYOD”. Everyone has a nail to go with that hammer, but some nails look alot more like staples or screws.

I originally started this blog as a test. Initially, I wanted to get connected via IPv6, but more than that I wanted to have content that was reachable via IPv6. My current webhost doesn’t provide IPv6 connectivity, so I started the blog on a server at home connected back over an IPv6 tunnel provided by Hurricane Electric’s tunnelbroker service. Having this public site also allows me to play with things like DNSSEC, which also isn’t exposed through my current webhost’s control panel. So life was good and the test worked.

As you can see from looking back at this blog, there hasn’t been much activity since I spun up the site. This has been both good and bad … good in that there’s very little traffic, so no one notices if the power goes out at home, or I shut down the home lab (or make a config change that causes the lab to melt down). The problem though, is that the site is still hosted at the other end of a residential Internet service, so bandwidth is optimized in the wrong direction. Latency has been a problem, and ultimately I just wanted to get it off the lab ESXi box and into something more suitable. Enter, HP Cloud.

Ryan Adzima (@radzima on twitter) had posted a comment about HP Cloud as an alternative to AWS and some of the other cloud providers. While they don’t offer direct IPv6 connectivity either, it was easy enough to configure a static host tunnel back to Hurricane Electric in order to bridge that gap. Within a short amount of time, I had wordpress installed (along with apache, mysql, and php), and DNS changes propagating to point to the new site. To get the Hurricane Electric tunnel setup, I did a quick Google search and used the notes from Billy Dickson’s blog to get things up and going quickly. I don’t use the ufw configuration he discusses, however, and instead use two iptables scripts mentioned on the ubuntu help site for keeping the iptables rules persistent across reboots.

One thing to point out if you’re going to run iptables to firewall your traffic, you need to ensure that IP protocol 41 is allowed as that is the protocol number for the 6in4 tunnel. You can use a rule like “iptables -I ipv6-gw_in -p 41 -j ACCEPT” to accomplish the accept, although I also locked down the specific tunnel server IP for Hurricane Electric and the physical interface.

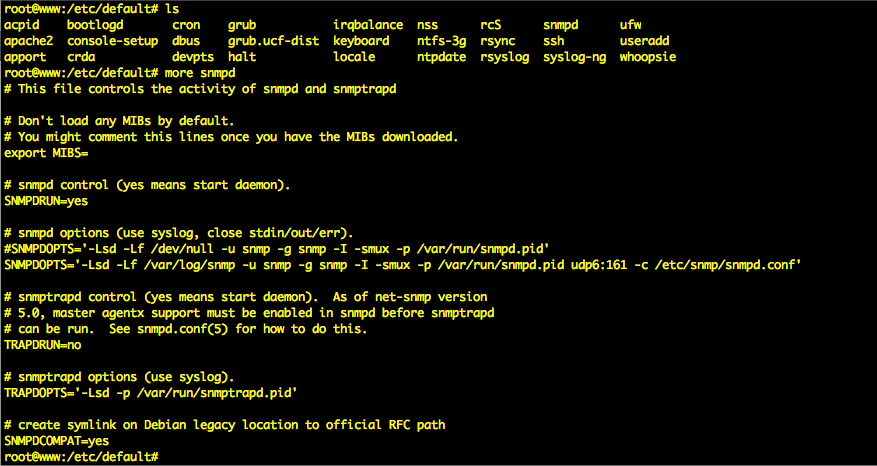
I also ran into one problem with the software installs where for whatever reason, MySQL was not completely integrated into the PHP/Apache installation. The symptom came up when I first tried to connect to the WordPress site, I would get the error “Your PHP installation appears to be missing the MySQL extension which is required by WordPress”. To resolve, I simply edited  /etc/php5/apache2/php.ini and added the lines

extension=mysql.so
extension=mysqli.so

Saving and restarting apache cleared up the problem, and I was once again seeing the appropriate mysql goodness in the phpinfo output.

One last note, more for me than anything else … when migrating to a new host and wanting to compare the packages that were installed via apt-get versus from source, one way to do this is with the command:

dpkg –get-selections

With that, I was reminded that I had tried to install WordPress via apt-get originally, however the Ubuntu package is stuck back at 3.3.1 and does not auto-update. I opted to stay current ahead of waiting for updated Ubuntu packages, so installed from source.

With this change in hosting, I feel I’m getting more of an urge to be active on the blogging side of things. We’ll see, and I’m looking forward to comments and/or feedback on the effort.

Charlie

Posted in IPv6 | Leave a comment

ESX 5.0 Update 1 on Mac Mini 5,3

Finally, success! I was able to get vSphere 5.0 Update 1 loaded on a current Mac Mini (5,3) and patched to the latest bundle from July.

While there are many websites that document the process for installing ESXi onto the Mac Mini, I ran into a few problems along the way so will use the next couple blog posts to document the process that worked for me.

For this post, I’ll capture the various websites that I used for the info to get me started:

Christopher Wells on vsamurai.com

AngryCiscoGuy

The first two links really planted the seed for this project. Working with virtual appliances, the idea of having a small/quiet ESX form factor was appealing for many reasons. I think it was AngryCiscoGuy’s blog that I saw first, but then vsamurai provided the step by step process that he had followed to get me going down this route on my own.

Along the way, I also ended referencing the following:

VirtuallyGhetto

CloudJockey

Paraguin Consulting

A couple of tidbits for this introductory post. While several of the blogs referenced above go to great detail to document the process they used to get ESX up and running, not all of the steps appear to still be valid. For instance, I was unable to get the Mini to boot from the the ESXi installers I downloaded from VMware … the only way I was able to get ESX to boot for install was to boot from a USB drive.

I’ll get the steps I used documented and also ensure that the solution is stable on the current patch bundles. I’ve also got a Thunderbolt GigE adapter I want to try out in order to get dual NICs running so I can separate storage and VM traffic across different links.

Posted in Apple, VMware | Leave a comment

Hurricane Electric IPv6 Certified

After having had my IPv6 tunnel with HE configured for a few months now, I’ve finally gotten around to putting a host on my end of this tunnel (this site) and running through HE’s IPv6 certification program.

I plan to blog more about the lessons learned as I stood up this site, particularly as I planned to make the site’s connectivity and mgmt as focused on IPv6 as I could (seems only fitting, if one of my planning blog topics is supposed to be IPv6, this site should eat that dog food eh?).

You may have noticed the IPv6 certification banner on the right side of the site. Hurricane Electric, in addition to their free tunnelbroker service, provides an educational service that steps through the processes and tech knowledge around IPv6, to help ready the industry for the upcoming migration towards IPv6. Even for a network guy like myself, this certification process was both helpful and a good learning experience (even if I was setting up sendmail and mx records to point to an IPv6 host instead of just handling routing and security).

If you’re just starting out with IPv6, I highly recommend taking a look at HE’s educational resources.

Posted in IPv6 | Leave a comment